DIY Green Crafts for St. Patty's and Spring!
With spring around the corner and today the celebration of St. Patrick’s Day, everything is coming up green! Here are easy , make-from-home with what you have for crafting and fun with the family as recently seen in my segment for Live! with Kelly & Ryan!
Lil’ Lepreuchans
A fun craft for the whole family that repurposes a toilet paper roll!

What you’ll need:
Toilet paper roll cardboard insert
Construction paper: yellow, green, black and favorite skin tone-hued paper
Pipe cleaner in orange or red
Black pen
Scissors
Glue Stick & Hot Glue
Tape: double stick and satin
Clothes pins
Honestly, these directions make it seem much harder when listed out than it is. Just have fun decorating the toilet paper roll any which way you like, and really have fun with the leprechaun’s facial expression!
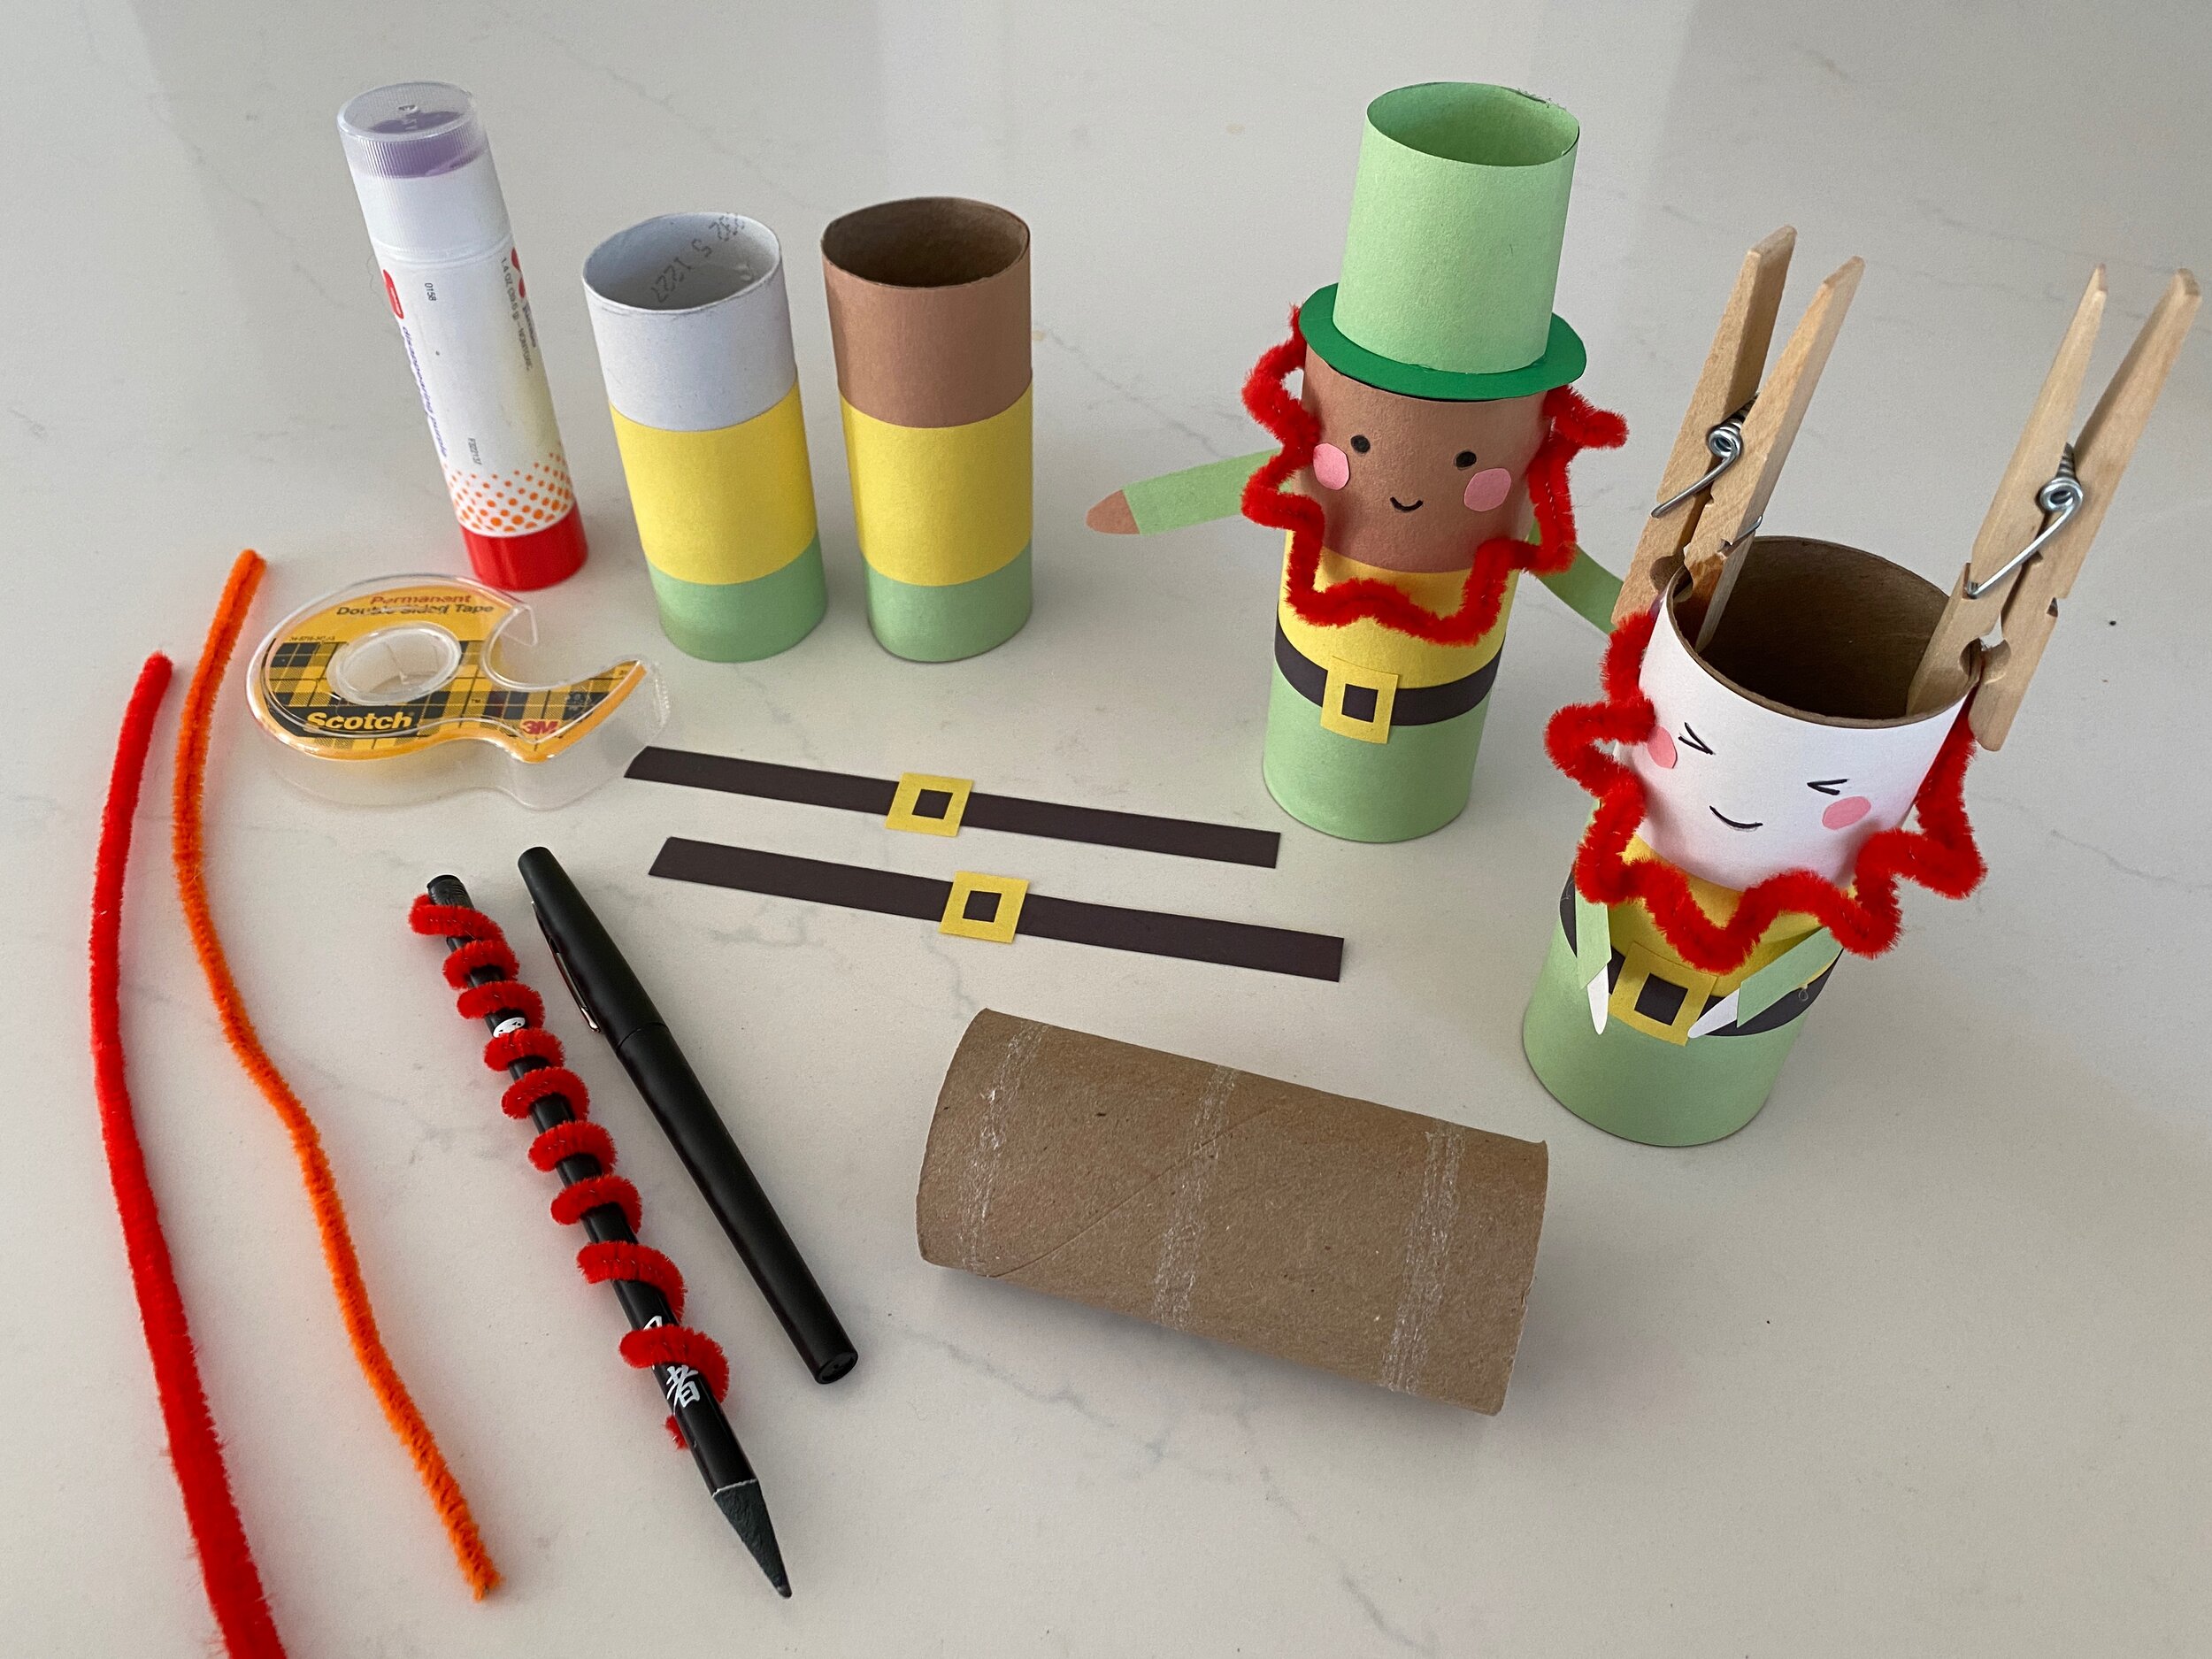
Cut the skin tone (face), yellow (shirt) and green (pants) construction papers into 1.5” x 6” strips respectively. Attach to toilet paper roll cardboard insert from head-to-toe using double stick tape.
Create a black belt with a yellow buckle out of construction papers and place over the seam where the yellow and green meet.
Cut two arms out of green paper: .5” x 4” strips. To one end, add skin tone “hands” using a glue stick to secure. Using satin tape, tape to back of the roll so the arms hand outwards!
Coil tightly a red or orange pipe cleaner around the black pen. Hold the “beard” up to check framing around the leprechaun’s face, cutting off any excess. To the sides of the face, secure pipe cleaner ends with glue from a hot glue gun, and clip with clothespins until glue is dried, then remove the clothespins.
Draw on a face with the black pen. Draw on pink circle cheeks or use pink construction paper circles applied with a glue stick.
To create hat: Cut out a green strip 1.5” wide x 6”: long enough for ends to meet and overlap so as to be the same diameter as the roll: secure with double stick tape. Cut out a green circle 2.25” in diameter (this is slightly wider than the roll’s diameter) to serve as the hat’s brim. Secure hat to brim using dots of hot glue: allow to cool. Then secure to the head of the leprechaun, again using dots of hot glue.
Leprechaun Frame!
Transform any kid or family photo portrait pic into a naughty leprechaun frame!

What you’ll need:
Orange, green, black and yellow construction paper
Scissors
White glue
Close portrait photo
The dimensions for the orange beard and wispy bangs cutouts will vary greatly depending on the size of your photograph! I used the face size as a guide, and held up construction paper to the face’s jawline and traced out the beard. Same for the wispy bangs.
Tip: You’ll note the rich orange color, as I used orange felt in stead of construction paper. I had a square of it handy, and it made 4 leprechauns hairy!
As for the hat, I love an oversized and slightly tilted leprechaun hat to make it fun! Bottom line: it’s a day-of craft and just have fun with it!
Tip: trim off excess photo below and around the face AFTER cutting out the beard and hair elements to check for framing. Do not cut tightly around the face! You’ll need an edge to glue the beard onto.
Luck O’ The Irish Wreath

You’ll note there’s a little space left to complete on this 14” ring, which Kelly will do on the show!
Who couldn’t use a little luck this time of year? This can be done last minute with things you have around the house!!
What you’ll need:
File folder
Scissors
Various shades of green construction paper or card stock
A 10”, 12” or 14” ring
Hot glue gun
Jute string or ribbon to hang
Using a shamrock stencil you make yourself out of the file folder, cut two sizes of shamrocks: approximately 16 large shamrocks 3.5” diameter, 8 smaller shamrocks 2” in diameter. Alternate colors, use some fun metallic scrapbooking papers if you have it, cut out shamrocks of different leaf shapes, etc.
I will be demoing on a 10”-inch, white styrofoam ring that I spray painted gold, while Kelly’s ring is 14” inches and a green styrofoam ring. If you don’t have a ring at home, you can cut one out of cardboard.
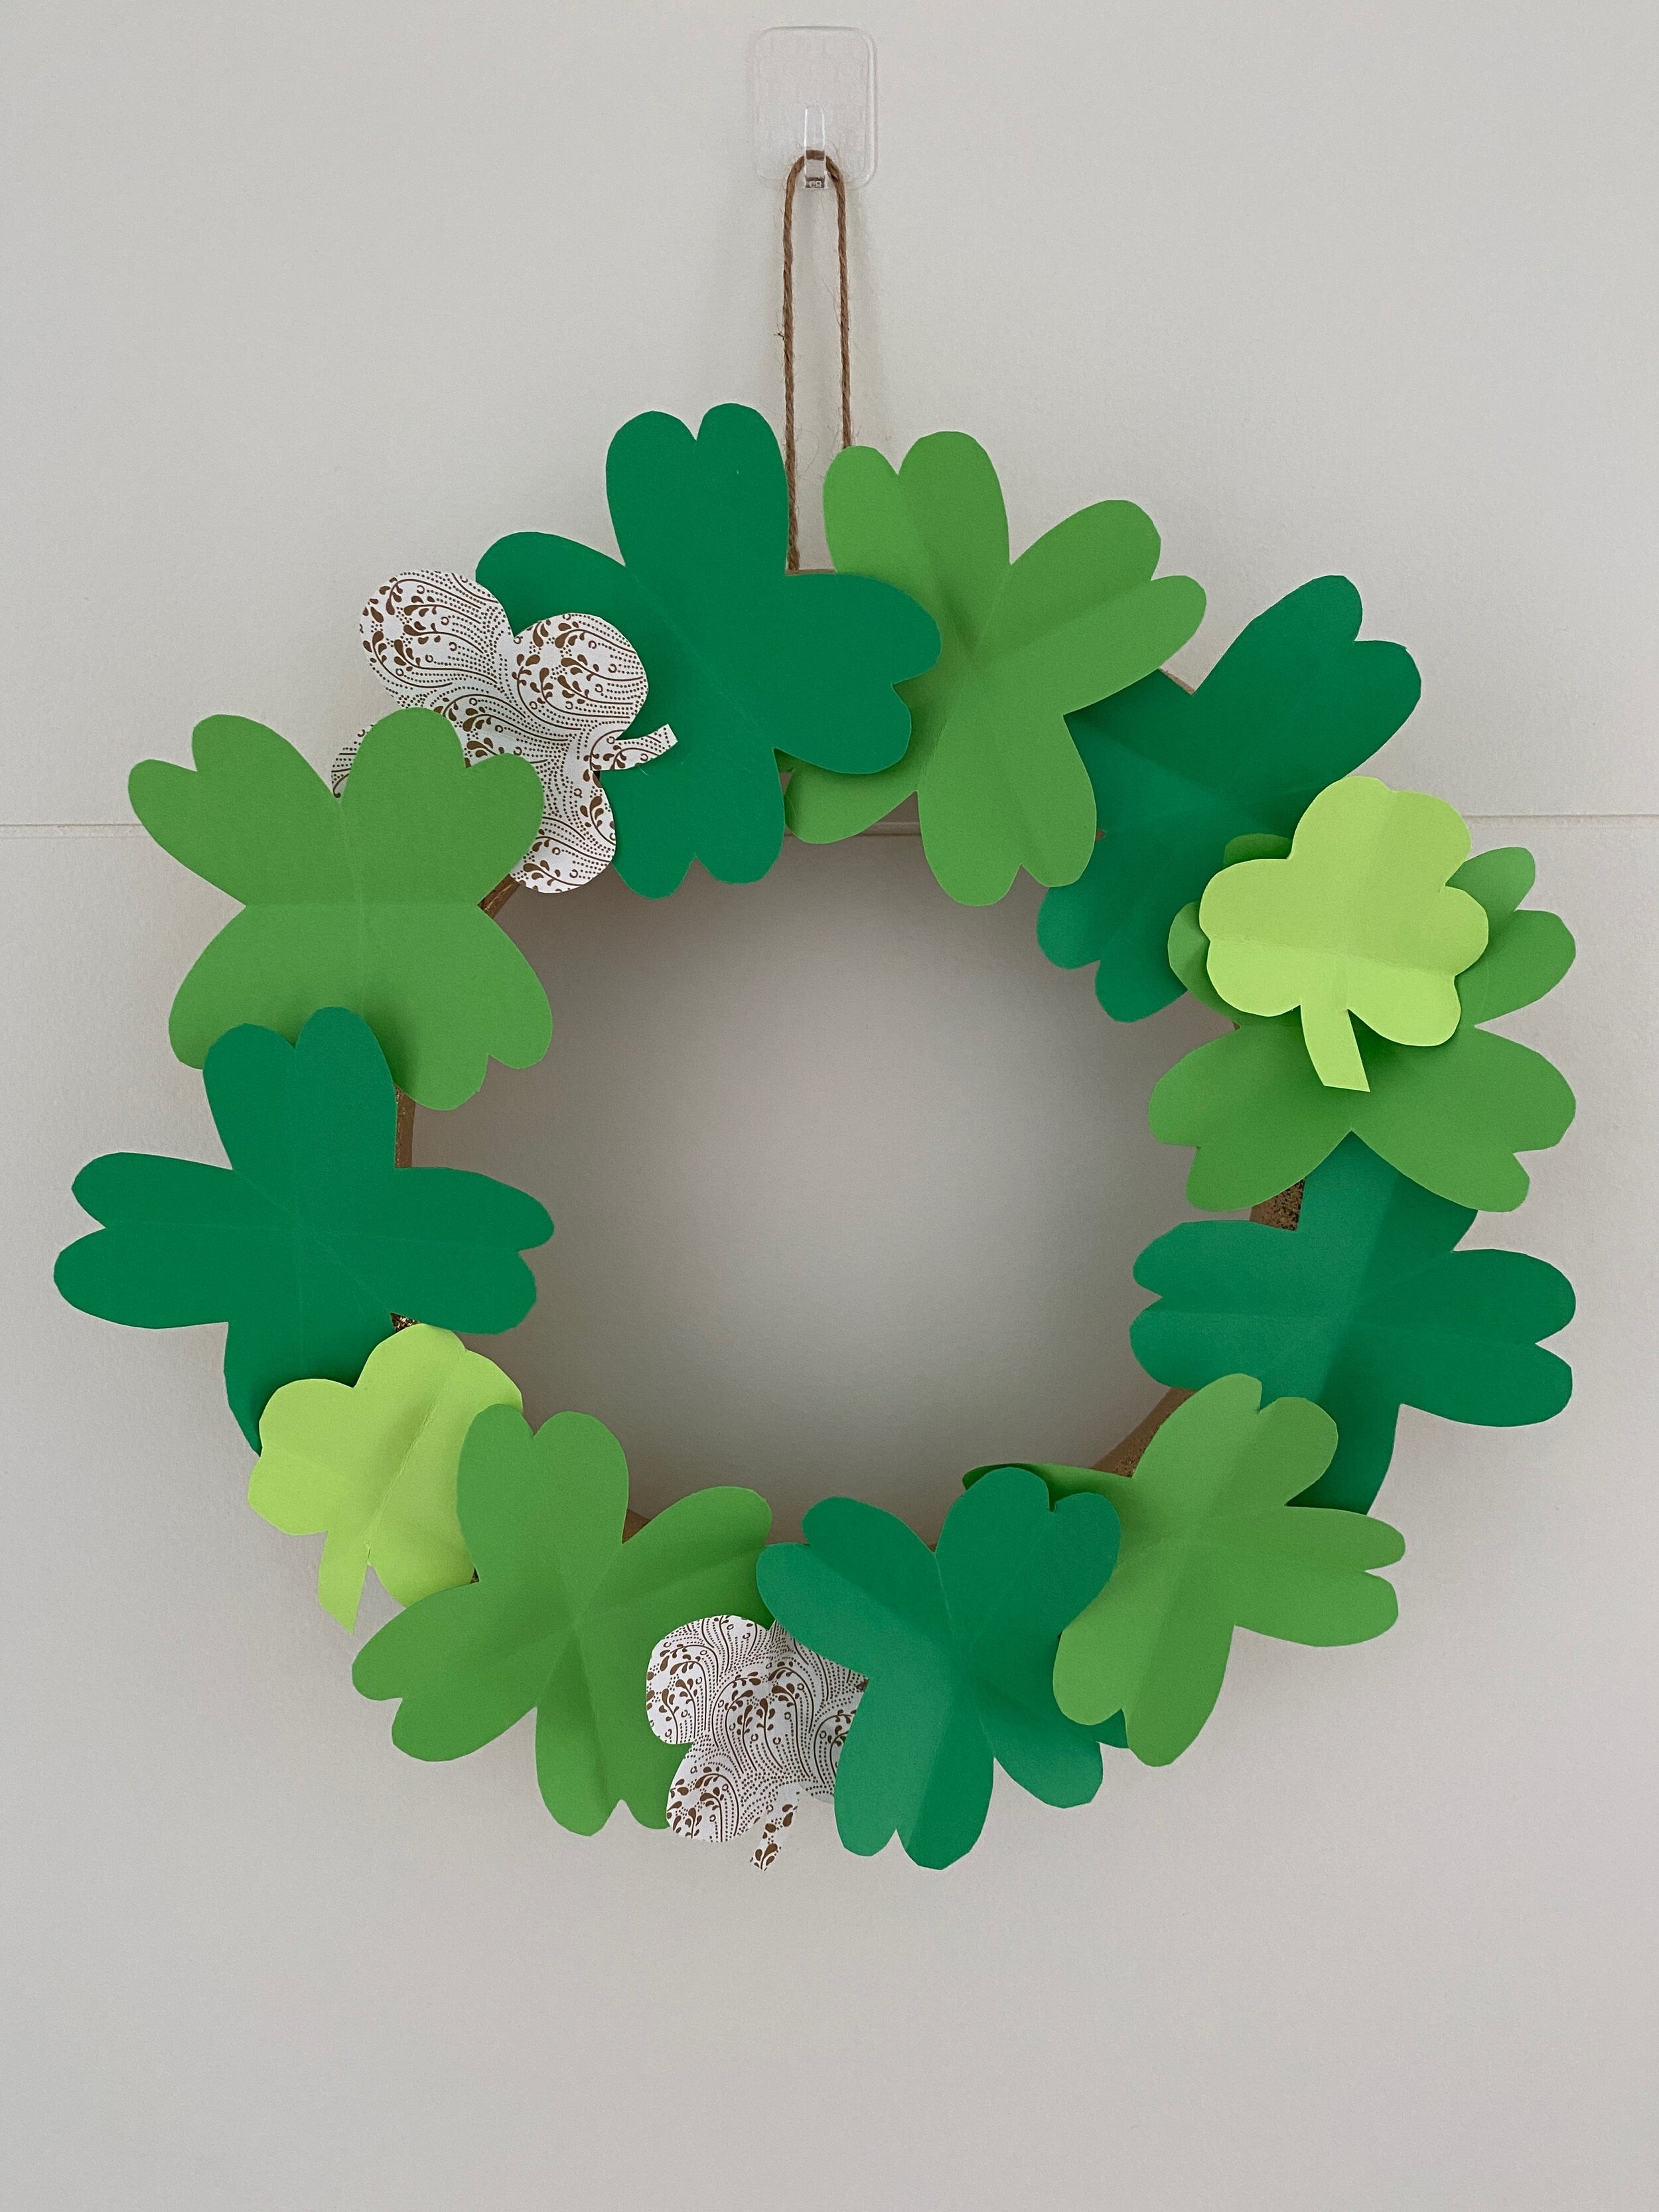
This is a 10” ring spray painted gold.
Tip: before gluing, fold shamrocks twice on the diagonal so that they get an “X” across their center! This provides lift and more of a two-dimensional feel when hot gluing them randomly, overlapping and atop one another, trying to alter green colors and shapes...like a beautiful field filled with clovers!
When complete, flip ring over and hot glue the ends of a jute string to the top of your ring. You can do this with green, orange or white ribbon as well. You can glue atop this a small square of a paper to neatly tuck the string end’s out of sight.
Hang up, using a wall safe hook!
Greenery Frames
I love modern frames, and here’s an easy DIY to create green artsy frames you can hang up as is, or with glass and a picture.

That you’ll need:
Wooden photo frame
Green paint
Green moss or leaves
Hot Glue gun
Remove glass and backing from the frame.
I painted my white frames using green, non-toxic acrylic paint, so that if by chance I missed a spot, it would blend in.
Once dry, apply moss to frame using hot glue.
After completing the full frame, check for any spots that could use touch up moss.
DIY GREEN Blossoms
Nothing blooming yet or wish to have blossoms all season long? Make them yourself with this easy craft, and attach to faux branches (which I have) or real branches from your yard.

What you’ll need:
Green tissue paper
Green pipe cleaners cut into thirds or twisty ties from grocery store
scissors
Branches from the yard
Large Vase
You take a small stack of 5 green tissue paper rectangles cut out to about 2”x3”. Use a fan fold. In the middle, cut slits on either side without going through the middle. Tie pipe cleaner through the middle, giving one or two twists. Fluff if out petals nicely, and the scrunch overall with hand for a realistic look. Tie to branch using remaining pipe cleaner.
About 2-3 bloom per branch (depending on the size of your branches; I’m using faux paper branches for the display).
I will have a demo of this up on Instagram Reels!
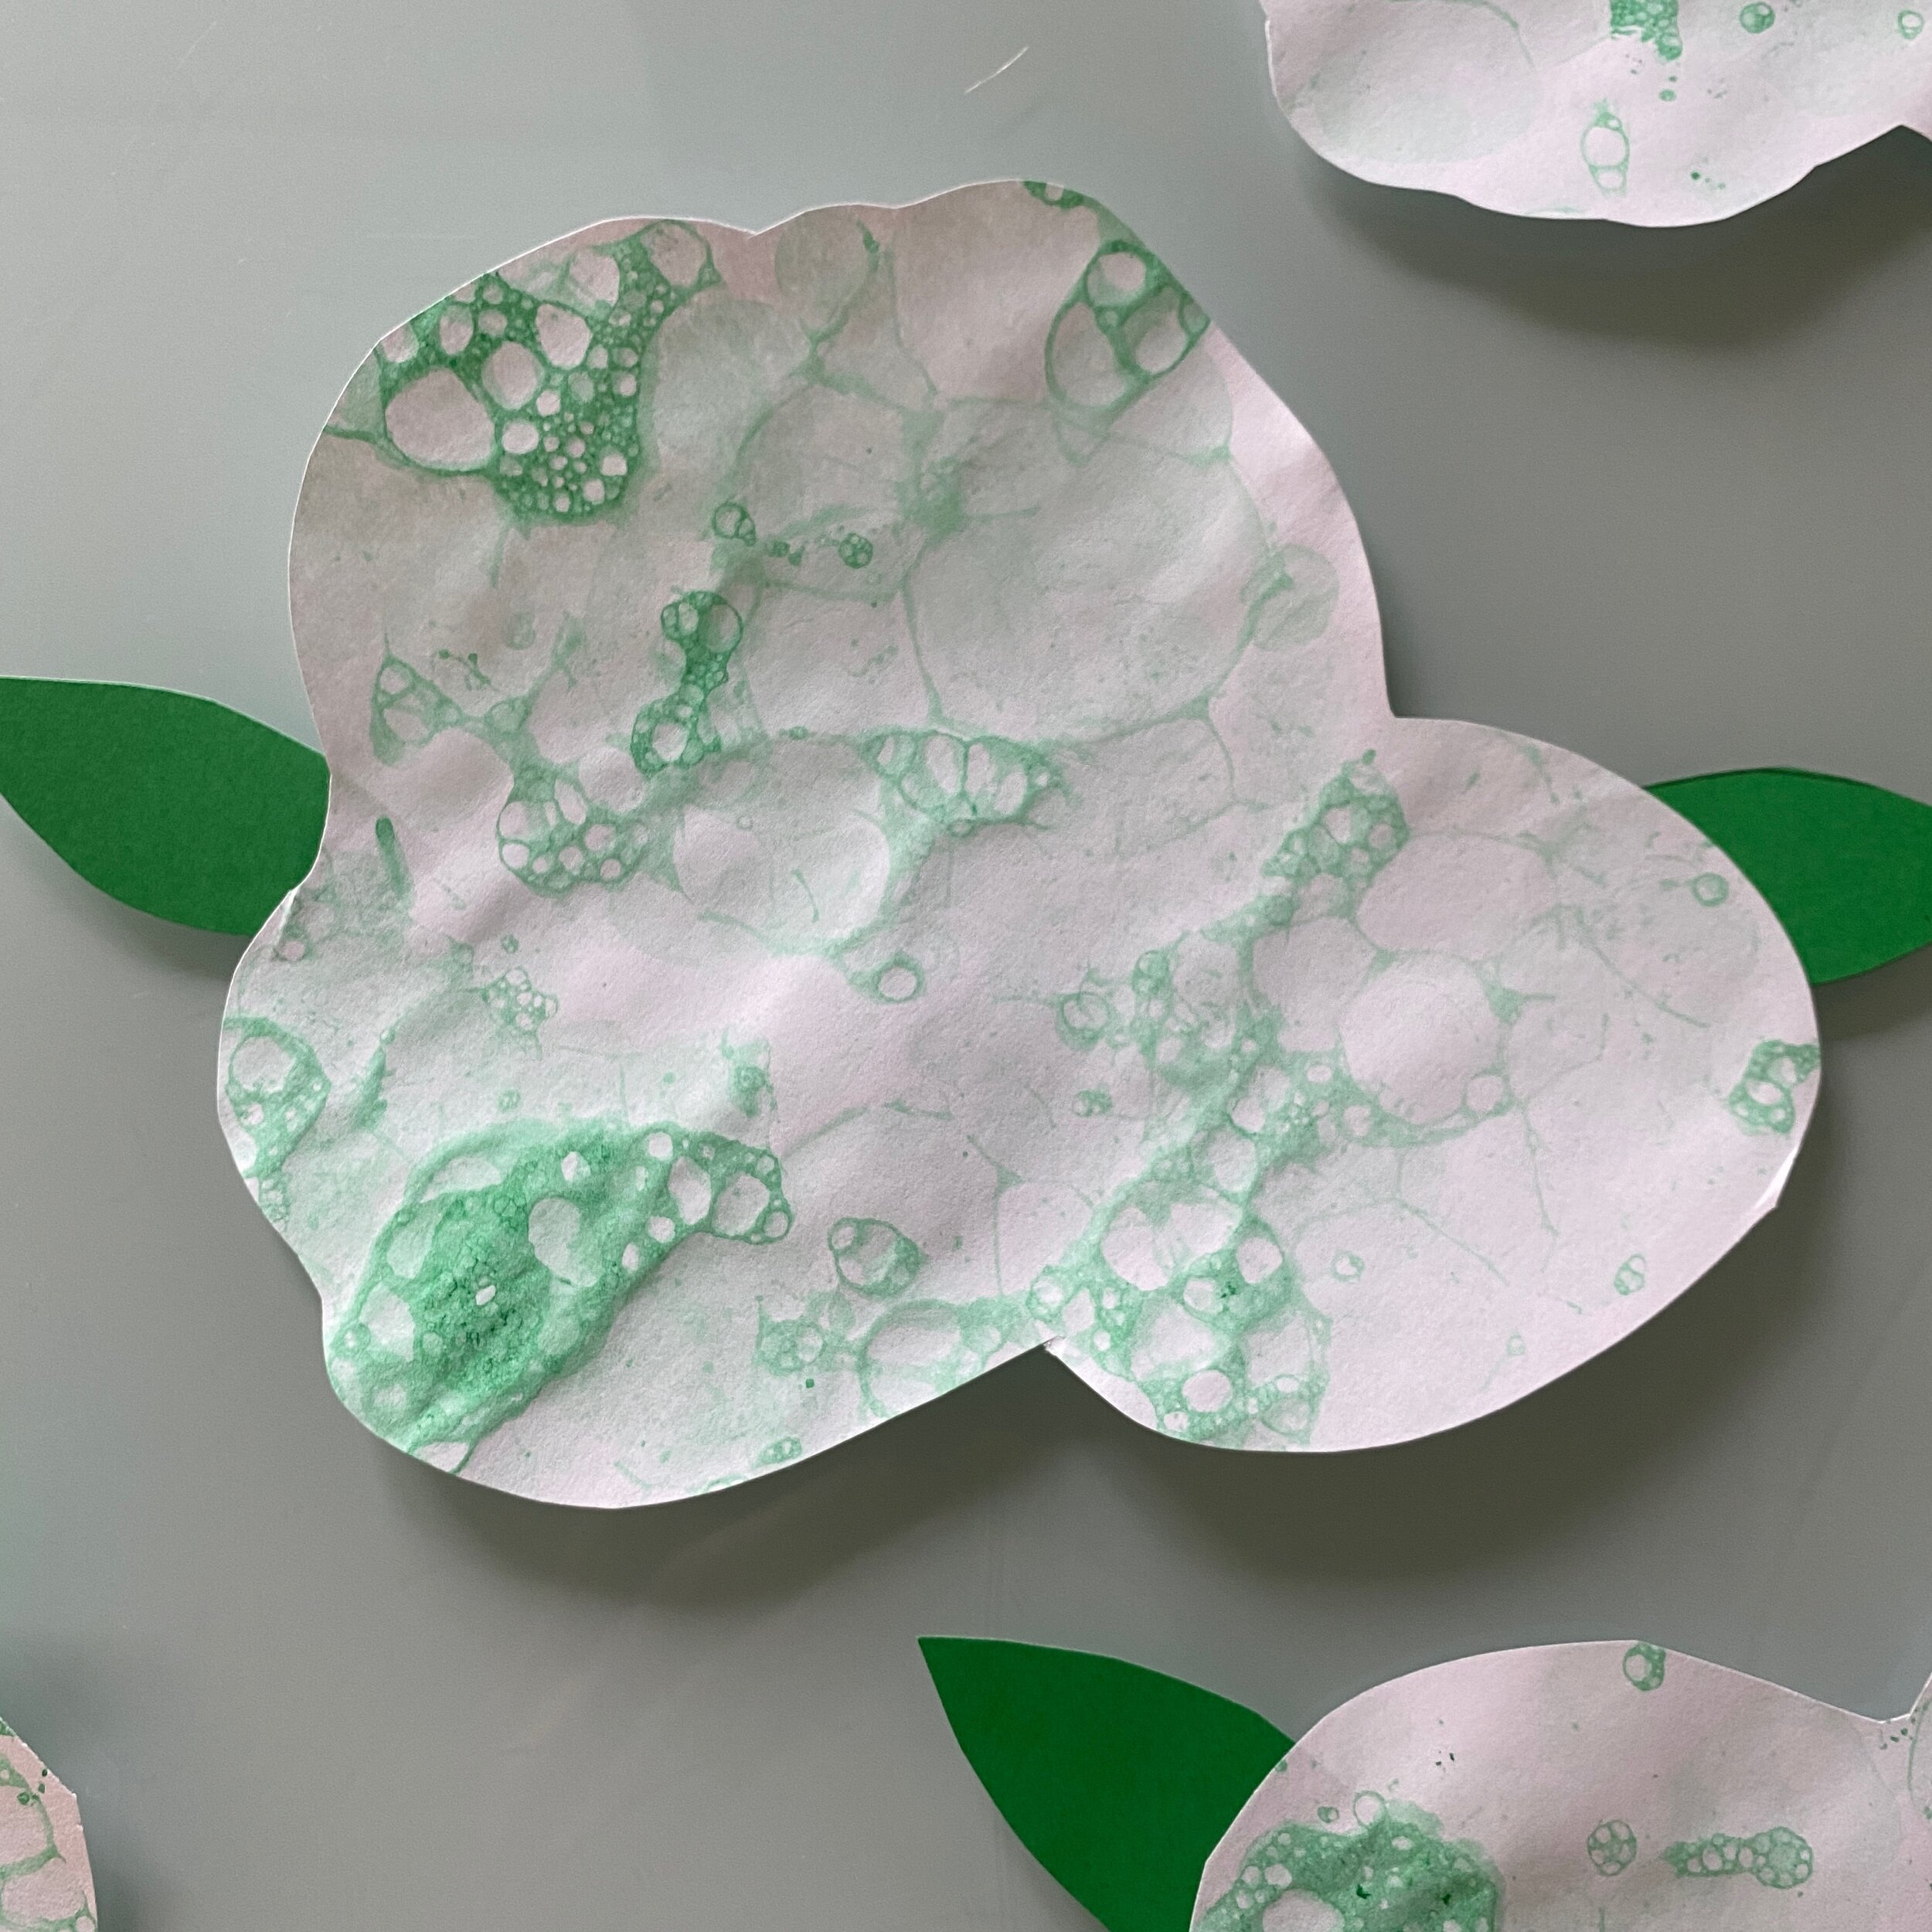
Green Hydrangea Bubble Craft
Super fun craft for kids who love to blow bubbles!

What you’ll need:
Bowl
Dish soap
Green paint
White paper
In a shallow bowl, add a couple of squirts of dish soap and a couple of squirts of green, non-toxic paint. Add a small amount of water and then blow bubbles through paper straws to get the bubbles above the edge of the bowl.

Using white printer paper, gently press paper down into the bubbles! And lift up. Blow more bubbles and repeat, dipping paper gently into bubbles each time!
Tip: avoid hitting the rim of the glass, and unfortunately environmentally green dish soaps didn’t work well as a suds agent to create a mass of bubbles, but other dish soaps did.
Once dry, cut out in the silhouette of a hydrangea head and add some paper cut leaves! This can of course be done with any color paint like purple, pink, blue, etc. to celebrate spring.
Fresh Delivery
Make a simple table centerpiece by repurposing old bottles or glass cups you are no longer using.

What you’ll need:
Glass jars or glass cups you are no longer using that could serve as a vase
White chalk paint or similar matte paint
Paint brush
Jute string
Greens or flowers cut from the yard
Paint white with chalk paint small bottles you get at the dollar store or glasses you are no longer using.You will most likely need to paint two coats to get a nice, farmhouse decor feel.
Tie jute string at the lip.
And place assorted greenery in the bottles for a spring fresh arrangement -- that has more staying power than flowers!
Makes for an elegant centerpiece or an accent in any room.